I downloaded the datasheet for my PLL.The closest option in setfsb was ICS9LPR501HGLF. I press getfsb which does read the right frequency. Then I move the slider (top slider) a little bit and then press setfsb. The HDD lights up, I can move the mouse but not interact with anything. Then a few seconds later I get the BSOD and then the laptop restarts. This happens even if I don't move the slider, just press getfsb then setfsb. This also happens when I "Select source for SATA clock" to be "Sata = PLL2" That is, change bit 1 of byte 0 to 1. Which is what setfsb tries to change, among other things, but this is where it goes wrong. So the reasons setfsb didn't work for me are:
1. My TME strap status (read only) reads 1 = no overclocking.
2. My system did not like how setfsb's ICS9LPR501HGLF overclock was changing the SATA clock from PLL main to PLL2
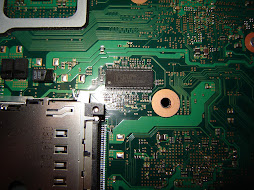
Here are photos of my PLL: before after and after the modification.Basically as you can see from the photo I found that next to the resistor there was a GND pad and a pad that was connected to the TME pin (pin 4). I found this by using a multimeter. I tested points on the motherboard with the system chassis to find GND. I tested points on the motherboard with the pin 4 (TME pin) to find the second pad. So I removed the resistor and put it into the new position. I did some tests with a DMM to check my work and then closed the laptop back up. I started the laptop and it’s working perfectly, the best part is that now TME = 0, confirmed by reading the TME_READBACK register 9 bit 6 being 0. I used setfsb to increase the fsb a little, and I took a picture of my screen with a camera since setfsb causes my laptop to freeze. After the laptop restarted I then manually copied the register values that I saw in my camera to setfsb, except I did not change the source for the SATA clock. So bit 1 of byte 0 is 0. Then when I pressed apply it worked without freezing my notebook. Here is the screenshot. I sent an email to Abo (creator of setfsb) and provided this info to him. He then gave me a test version that adding ICS9LPR501SGLF PLL support. The only difference now with setfsb between ICS9LPR501HGLF and ICS9LPR501SGLF is that the bit that is used to select the source for the SATA clock is unchanged in SGLF. Now using setfsb I was able to overclock my FSB to over 270mhz, my CPU frequency went from 2ghz to over 2.7ghz and is stable without and modifications to ram timings.
Here is an album of successful OC screenshots.
More images:


I have a thread in a forum that has more information here:
http://forum.notebookreview.com/showthread.php?t=393027